Important Notice
By installing my child theme, you will receive the template design along with demo content, just like in the demo preview. Your existing content and blog posts will remain unchanged.
After activating the theme, the layout will not transfer immediately. Please follow the tutorial on this page to recreate the same look as shown in the demo.
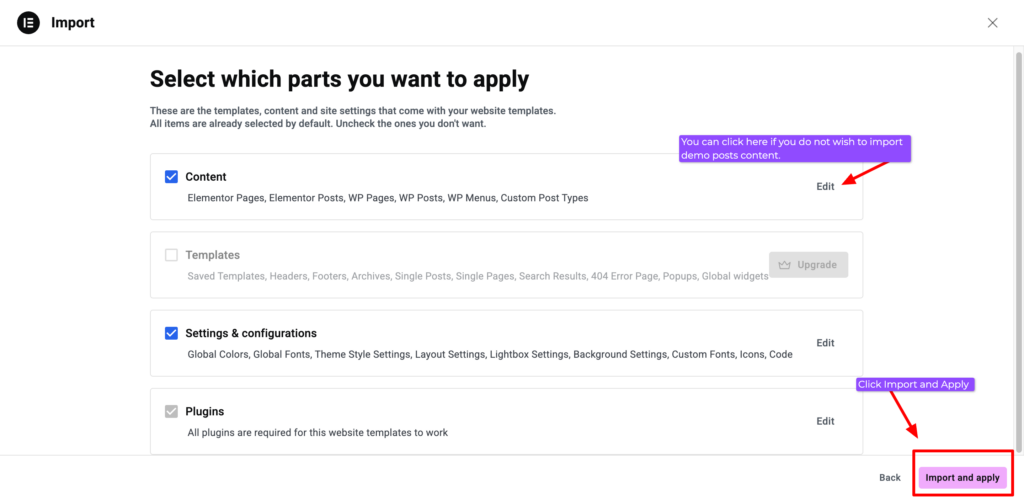
If you have previously installed an Elementor template before, you can uncheck the option to import the demo posts.
After importing the Elementor template kit, the demo pages (including images and text) will appear on your site. You can then edit these pages and replace the images and text with your own content.
This template is built using Elementor Free, so some advanced features available in Elementor Pro are not included. However, all layouts shown in the demo can be recreated using the included templates.
Files Included in Your Download
In your purchase folder, you will receive two .zip files needed to install the template.
1. Kadence Child Theme
This file contains the theme structure and demo setup.
The file name will usually look like this: example-theme-by-skyandstars.zip or soluna-theme-by-skyandstars.zip
2. Elementor Template Kit
This file contains the page layouts used in the demo design. The file name will usually look like this: themename-elementor-kit.zip
Both files will be used during the installation steps explained below.
Template Installation Guide
Before installing the template, please make sure the following requirements are completed.
1. Install WordPress
Your website must already have WordPress installed.
2. Install the Required Theme (Kadence)

This template uses the Kadence Theme as the parent theme. Go to: Appearance → Themes → Add New → search for Kadence, then install. Do not activate it yet, as there is another theme you need to install in the next step.
3. Install the Child theme (The theme file you just purchased from me)
Go back to the Themes page: Appearance → Themes → click the Add New → select the theme file you purchased from my shop (e.g., example-theme-by-skyandstars.zip or soluna-theme-by-skyandstars.zip), click Upload, and activate the theme.
4. Install Elementor plugin
Go to: Plugins → Add New → search for Elementor Website Builder, then install and activate the plugin.
5. Import the Elementor Template Kit
Next, you will import the Elementor template kit file included in your purchase. Go to: Elementor → Editor → Tools, under Apply a Website Template, click Import. Upload the file named similar to: themename-elementor-kit.zip Click Import and wait for the process to finish. You can choose to not importing the demo posts by unchecking it. Once the import is complete, the templates from the demo will be available in your Elementor library.

Note About Page URLs
If you already have pages with similar names to the templates included in this design (for example: About, Contact, or Blog), WordPress may automatically create URLs like:
about-2contact-2blog-2
This happens because WordPress does not delete your existing pages. Instead, it adds numbers such as -2, -3, or -4 to avoid conflicts. You may want to update the permalink URL of the new page for better SEO. If you do not already have pages with the same names, there will be no URL conflict, and the pages will import normally.
Set Your Homepage
If your homepage still shows your blog posts instead of the demo layout, you may need to set the homepage manually.
Go to: Settings → Reading
Under Your homepage displays, select A static page, then choose the homepage template from the dropdown. I usually name this page “Homepage”, so you should see it in the list. Click Save Changes.
If it is already set correctly, you do not need to change anything.
Troubleshooting
Some pages (like Service or Contact) look different from the demo
Sometimes Kadence page layout settings may override the template layout. This can cause pages such as About, Blog, Service or Contact to look different.
To fix this, adjust the Kadence page layout settings:
Go to: Appearance → Customize → Page/Post Layout → Select Page Layout (for about, service, contact, or other static pages)
Then set the following:
- Page Title → Hide Title
- Default Page Layout → Full Width
- Content Style → Unboxed
- Publish / Save it
After updating these settings, refresh the page and the layout should match the demo more closely.
Blog post layout looks different
If the blog post layout or related posts look different, check the image ratio settings.
Go to: Appearance → Customize → Page/Post Layout → Select Archive Layout (for blog or archive layout)
Then set the following:
- Page Title → Hide Title
- Default Page Layout → Normal
- Content Style → Unboxed
- Under Post Item Elements → set the Featured image ratio to 2:3 (or depends on your preferred style)
- Publish / Save it